
April 18, 2024
24 mins read
24 mins read


For our latest blog post, RIB’s Auckland-based Senior Consultant Johnathan Mudrovcic explains how the ‘Dimension Cutouts’ feature can help streamline tricky takeoff in RIB CostX.
As Quantity Surveyors, there are many instances in our day-to-day measurement workflows where we would need to make deductions from a positive measure (ie. measuring gross quantities, before applying deductions to derive a net quantity). Off the top of my head, a typical example of such a scenario would be to measure the gross area of a concrete slab and retrospectively measure the deductions for any voids protruding through the slab.
RIB CostX offers you two options on how to approach deductions from a measured area. One is to simply apply a negative measure (using the Negative button on the Dimensions Ribbon) and then leave it at that. Alternatively, one could utilise the useful Dimension Cutouts feature, which is the feature that I will be focusing on in this blog, helping you add more useful functionality to your RIB CostX arsenal.
The first option (applying a negative measure) simply places a negative measure ‘on top’ of the existing positive measure. They are two separate dimensions, independent from one another. Whereas, the Dimension Cutout feature quite literally cuts out the negative measure from the positive measure.
You can use the Cutout tool to create one or more holes in an area dimension, or create holes that span across multiple area dimensions. The Cutout tool can be used on both Line mode and Point mode dimensions, but a Line mode dimension will be converted to Point mode if a Cutout is applied.
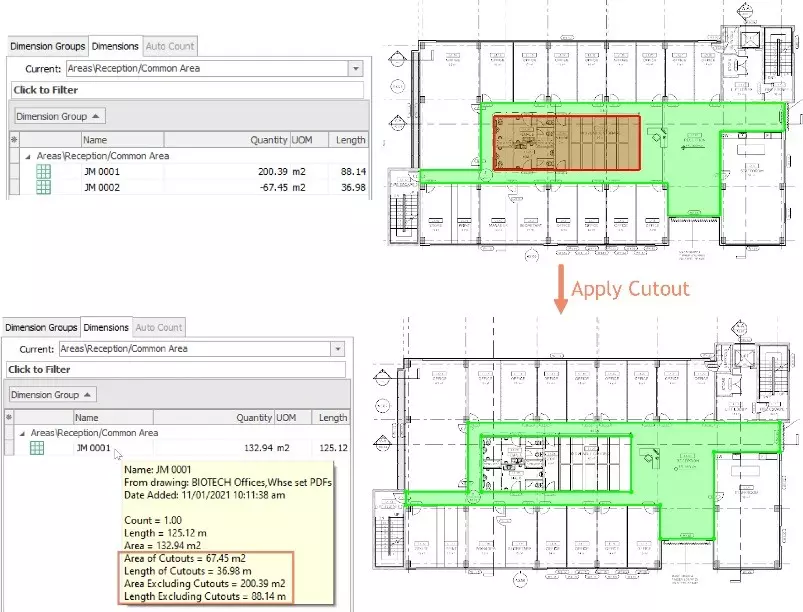
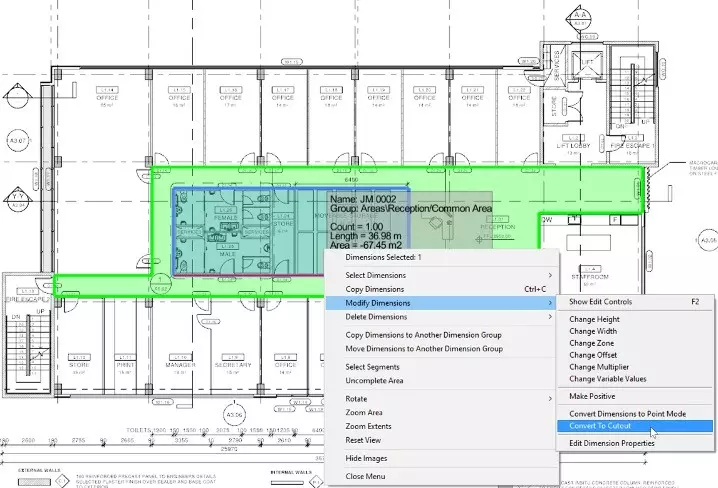
Below is an example where, as opposed to measuring around the unwanted ‘island’ area, the overall Reception/Common Area has been measured as a positive measurement (in Green) and the non-common areas have been deducted (in Red). By converting this negative area to a Cutout it is removed to leave only the required measurement, whilst generating a bespoke set of quantities related to the Cutout area itself. This methodology could be used for many different trades (ie. Flooring Deductions, Concrete Slab Voids, Skylight deductions in the Roofing Trade etc).
1. Measure the large areas as positive dimensions and the smaller areas to be cut out as negative dimensions, by using the Positive and Negative buttons on the Dimensions Ribbon.
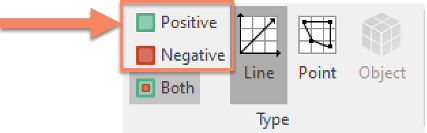
2. Once the Positive and Negative areas have been measured, ensure both the positive and negative dimensions are displayed on the drawing by selecting the ‘Both’ button.

3. To create a single hole, select the negative dimension. To create multiple holes, select both the positive and negative dimensions.
4. Then do either of the following:
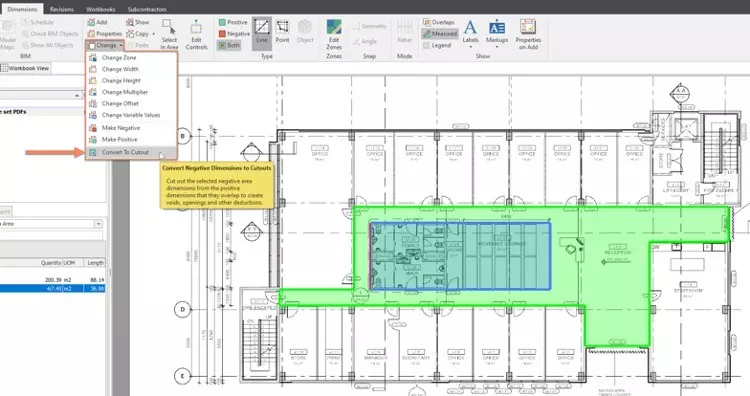
Once the selected areas are cut out, the negative dimensions will be removed from the Dimensions List and the area and length values of the positive dimensions will be recalculated to account for the holes.
For dimensions that contain Cutouts in their entirety, the following properties will be additionally available in the hint that is displayed when hovering the mouse over a dimension.
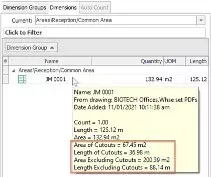
| Property | Description |
|---|---|
| Area of Cutouts | The total area of all Cutouts in the dimension. |
| Length of Cutouts | The total length of all Cutouts in the dimension. |
| Area Excluding Cutouts | The area of the dimension without subtracting the total area of all Cutouts. |
| Length Excluding Cutouts | The length of the dimension without adding the total length of all Cutouts. |
The above Cutout properties can be referenced in an expression (formula) by using their names in square brackets ‘[ ]’ (i.e. [Area of Cutouts], [Length of Cutouts], [Area Excluding Cutouts] and [Length Excluding Cutouts]). For example, you can use the formula [Area of Cutouts] for a Custom Quantity called “Slab Voids” and use the formula [Length of Cutouts]*{Height} for another Custom Quantity “Slab Void Formwork”. When composing expressions in the Expression Editor, you can insert these properties into the current expression by choosing them from the Properties tab of the editor.
Only Cutouts that lie entirely within a dimension can be removed. Removing a Cutout does not restore the negative dimension – it only removes the hole created by the negative dimension. To remove a Cutout, select one of the lines or corner points of the Cutout, then right-click and select Remove Cutout.
After creating Cutouts in an area dimension, it is possible to convert the area dimension to a negative dimension by using the Make Negative option. If the dimension is changed to a negative dimension, the Area of Cutouts and Area Excluding Cutouts will also be converted to negative values. If you have left the Area field at its default formula of [Area], the area value of the dimension will always equal Area Excluding Cutouts minus Area of Cutouts (i.e. [Area] = [Area Excluding Cutouts] – [Area of Cutouts]), regardless of whether the dimension is positive or negative.
On the other hand, the length, Length of Cutouts and Length Excluding Cutouts of a dimension will be maintained as positive values even if the dimension is converted to a negative dimension. If the Length field is left at its default formula of [Length], the length value of the dimension will always equal Length Excluding Cutouts plus Length of Cutouts (i.e. [Length] = [Length Excluding Cutouts] + [Length of Cutouts]).
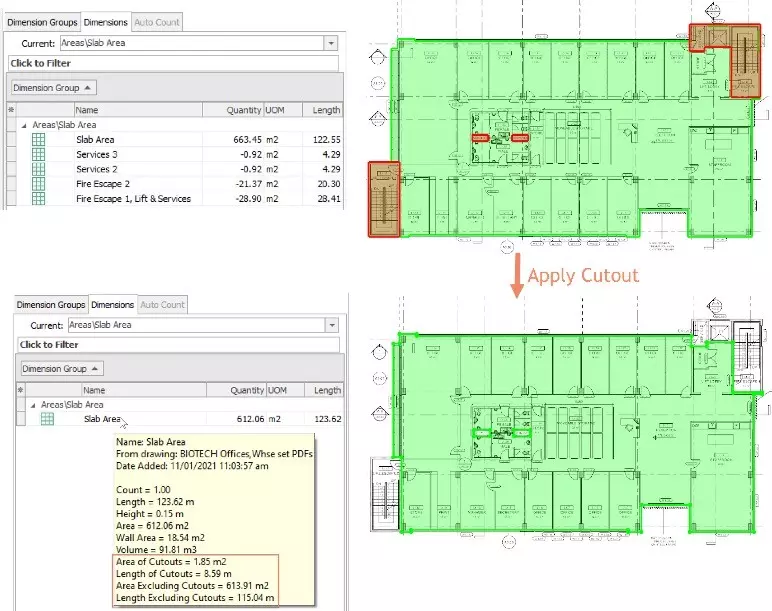
Below is a further example where the Stairwells, Lift Shafts and Service ducts are being deducted from a 150mm Concrete Slab leaving you with the exact net quantities required for the pouring of the slab (ie. Volume of concrete, Soffit Formwork Quantity, Edge Formwork Quantity).
Dimension Cutouts has proven to be a very popular feature since it was introduced in RIB CostX Version 6.9. You can see a video example of Dimension Cutouts in action in a recent ‘Carpentry’ webinar I conducted on decking areas (watch from 16:15 until 19:14).
Otherwise, if you have any enquiries about the advanced takeoff and estimating features on offer with RIB CostX, please don’t hesitate to contact your local RIB team today!

E-BOOK