

April 23, 2024
15 mins read
15 mins read


For our latest Consultant blog, RIB’s Canada-based Senior Consultant Anatoly Gelman has explored the Zone Categories and Zones functionality of RIB CostX, including the changes made in Version 7.0 of our platform.
Zones allow the capturing of measurements against specific attributes, such as floor level, functional area, or the stage of construction. Zones are grouped by zone categories. For example, Tower A, Tower B and Car Park may be grouped into one category; while Ground Level, Levels 1-20 and Levels 21-30 are grouped into another. Each dimension can be associated with up to 8 different zone categories at the same time.
Zones essentially provide the ability to categorize dimensions and can act as a filter, allowing you to analyze data for a specified area of interest. By using multiple zone categories, analysis of measured quantities or cost estimates by multiple parameters can be conducted.
In RIB CostX Version 7.0, enhancements to Zone functionality have been made including the ability to set default zones for drawings, the ability to filter the dimension groups list by zones in the Workbook View, Zones moved from Project level to Building level, and a New Description field for Zones. After summarizing the latest 7.0 enhancements we will review general zone functionality in RIB CostX.
Default Zones
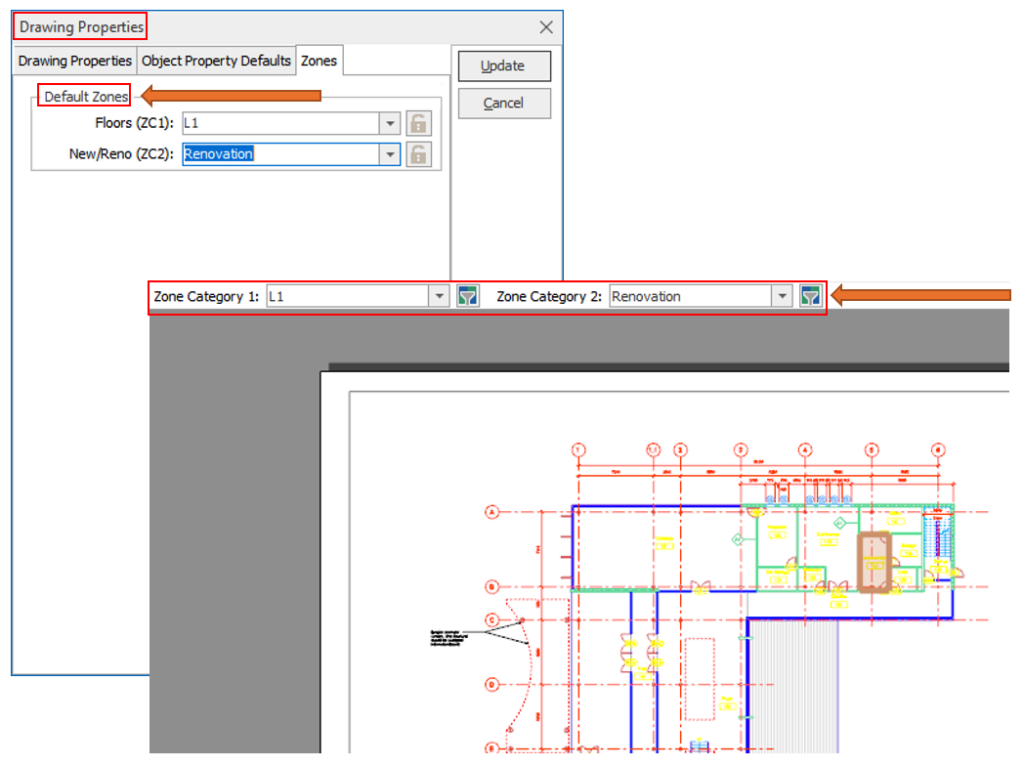
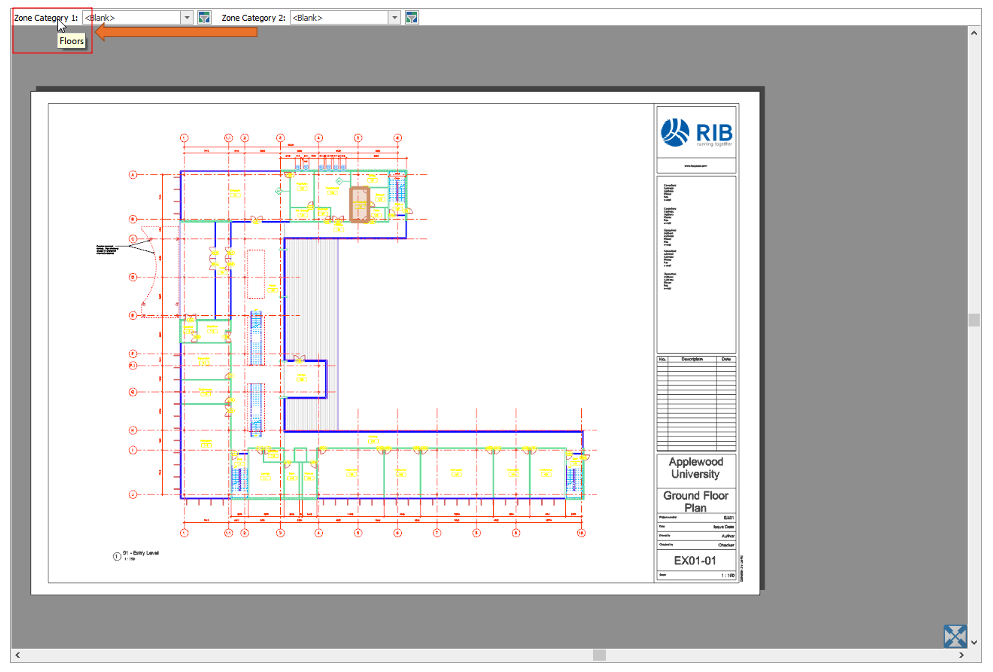
Enhancements to Zones now allow you to set default zones for a drawing by using the new Zones tab in the Drawing Properties. Fields in the Zone Selection Bar above the drawing window will default to the selection made here each time you open the drawing.
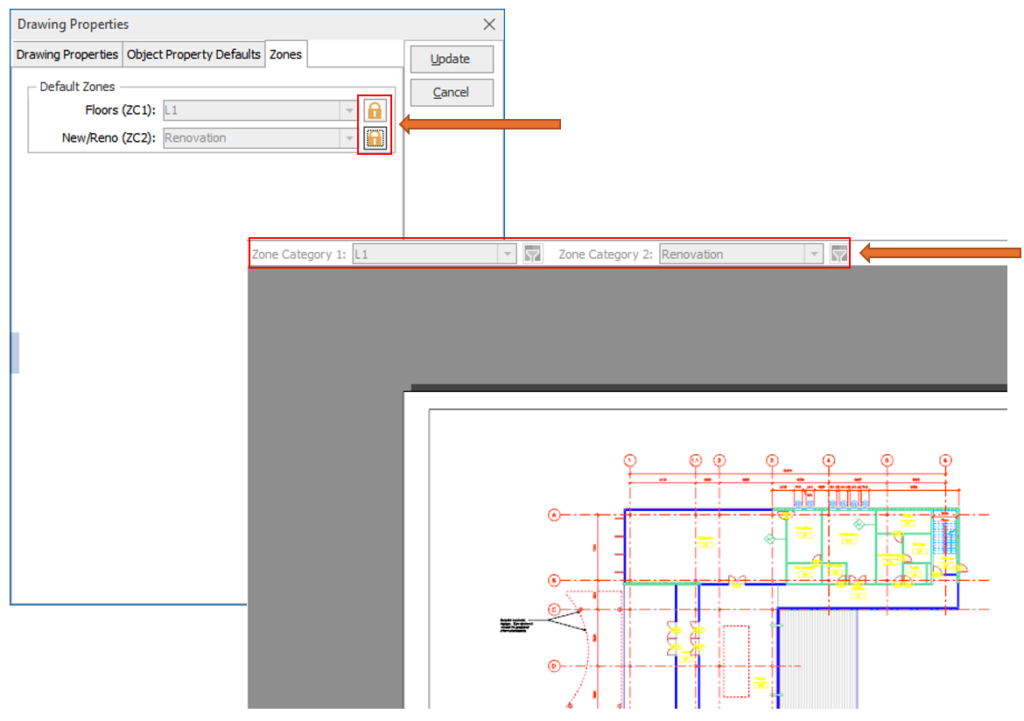
If you like, you can also lock the default zones by clicking on the padlock icon. This will assign new takeoff to those zones, as well as setting all existing measured dimensions on the drawings to those zones and lock the zone selection bar to that choice.
New Description Field for Zones
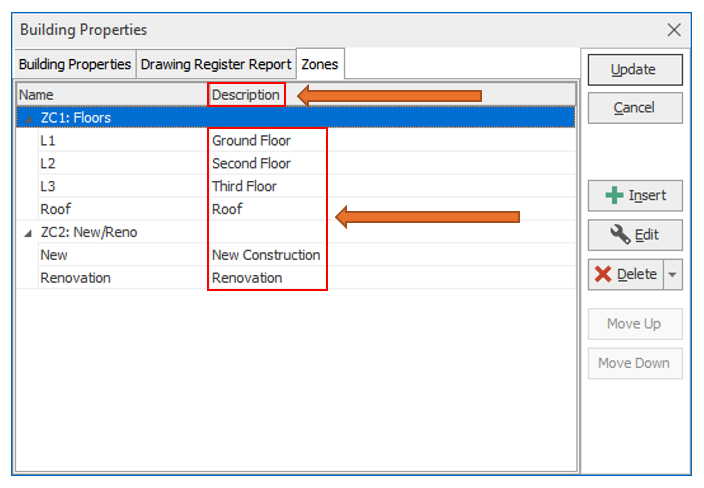
Zones, including Standard Zones and Building Zones, now have a new mandatory Description field. As zones set up in previous versions of RIB CostX did not have a description, the upgrade process to 7.0 will automatically populate their Description field with the zone name. A new Description column has now been added to both the Building Zones List and the Standard Zones List to display the descriptions for zones.
Zones Moved from Project Properties to Building Properties
In earlier versions of RIB CostX, zones were added at the Project level using the Zones tab in Project Properties. This has been moved. You can now use the new Zones tab in Building Properties to set the zones list for a Building. The zones of a Building will travel with the Building when you import and export.

Deleting Unused Zones
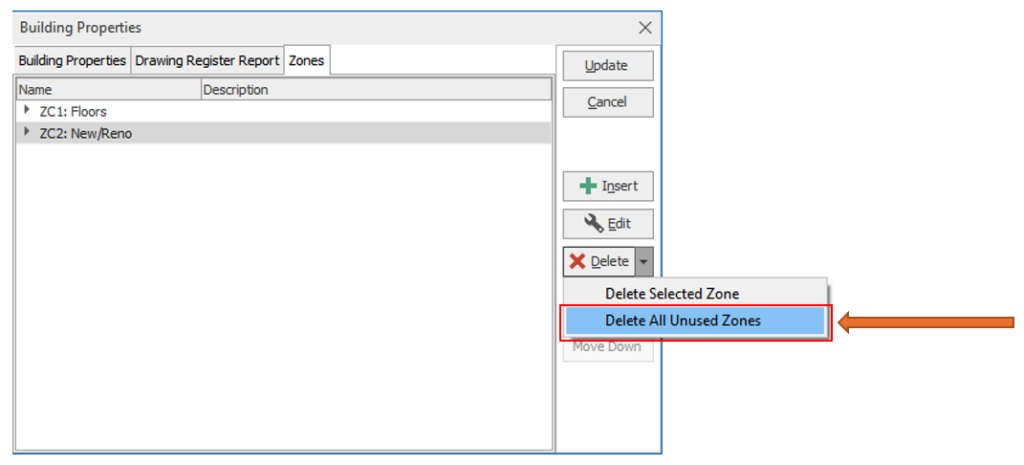
Zones that were added to a Project using previous versions of RIB CostX will be automatically moved to the Building level when you upgrade to 7.0. The upgrade process will copy all existing zones in a Project to each Building in the Project. This may result in some Buildings containing many zones that are not used in the Building. You can delete all unused zones in a Building at once by using the new Delete All Unused Zones option described below.

When you use the Delete All Unused Zones option, a zone that meets all the following criteria will be considered as unused and will be deleted.
Located in the Dimensions Ribbon, one can establish Zone Categories (Phase, Building, Area, etc). RIB CostX allows up to 8 different Zone Categories to be used at the same time.

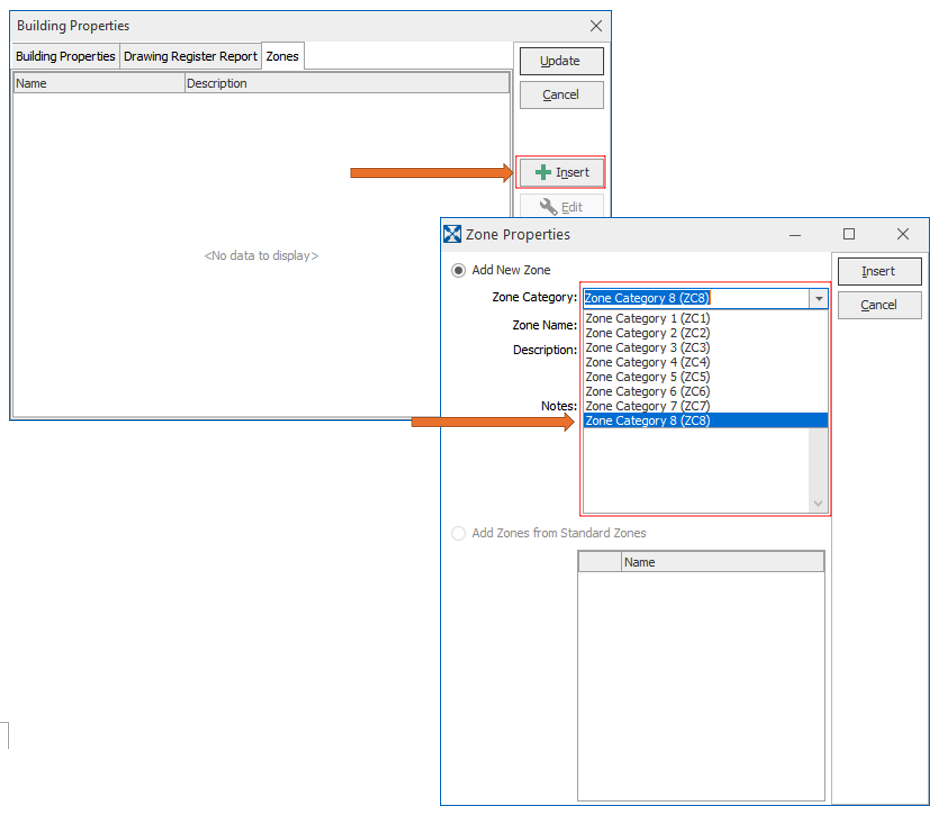
To start populating zones click on Insert in the Zones tab and start entering the Zone Name and Description as shown below. In my example Zone Category 1 (ZC1) will be floors.
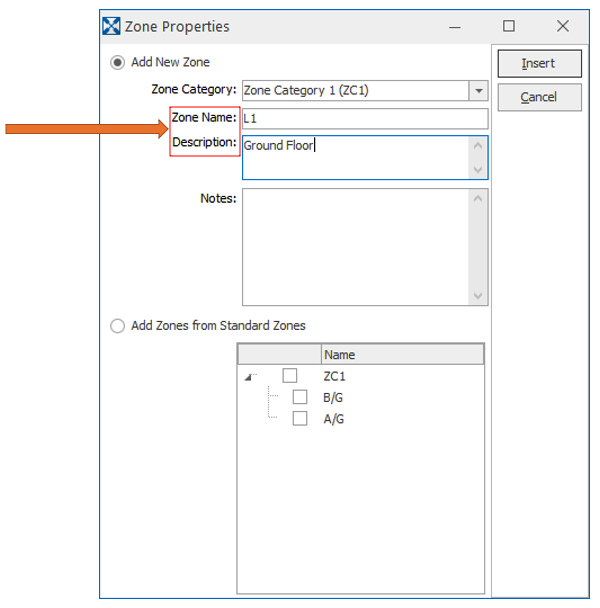
Insert the required zones for ZC1 one by one filling out the Zone Name and Description. In my example I’ve designated the required floors and construction type in Zone Categories 1 and 2 as shown below.
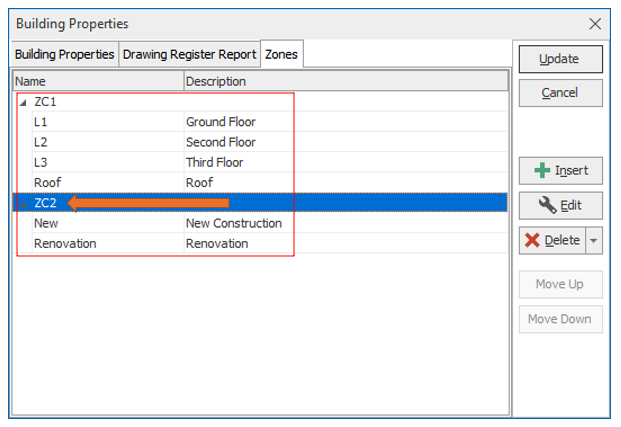
To append a description to your Zone Category, highlight the Zone Category, ZC2 for instance as shown above, and click on the edit button. The Zone Category Properties window will appear and allow you to name your Zone Category. In addition the Required box allows you to specify whether the zone (i.e., no zone) can be used when adding dimensions to the selected zone category. To require a Zone to be selected from the available zones set up for the current building, ensure the Required box is ticked.

With the Zone Categories named you can now see the appended text next to both ZC1 and ZC2.
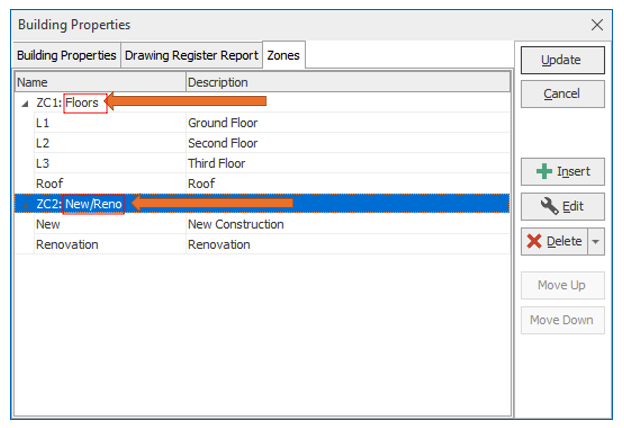
In Dimension View your appended text can also be seen if you hover over a particular Zone Category to provide a description of what the zone is.
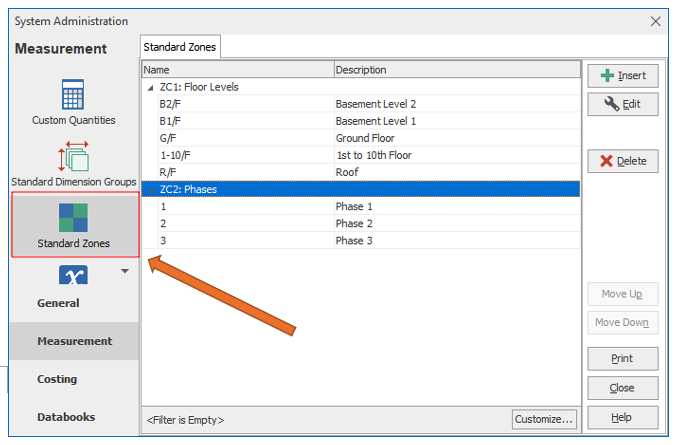
You can also build up zones in Standard Zones located in the System Administration area. Building zones here can save time if you’re working on similar projects often and need to populate a standardized set of zones which can be maintained here and then imported into your Building.
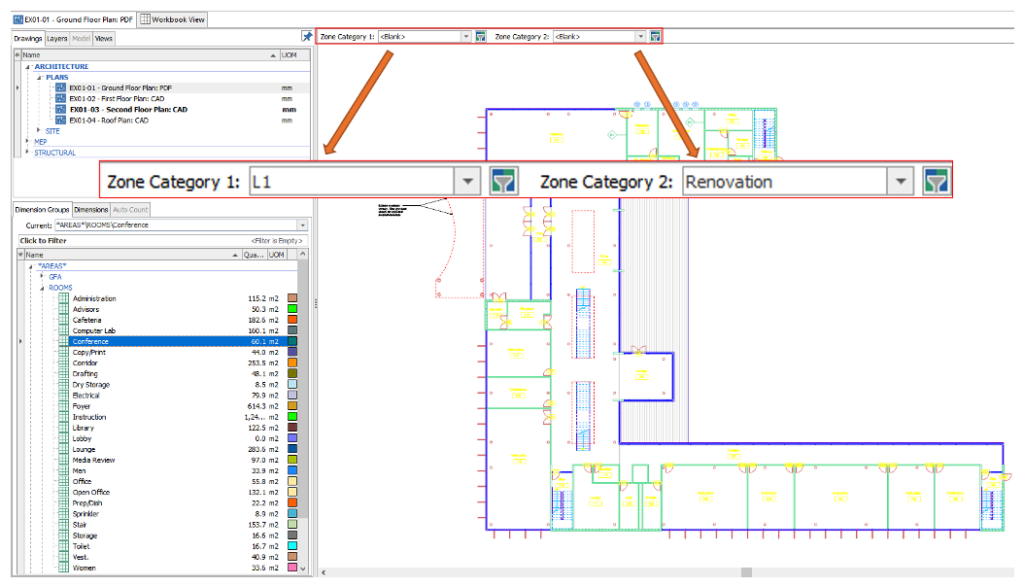
Starting to measure my functional areas, on the Ground Floor for instance, I select my desired Dimension Group, let’s say ‘Conference’. Then I specify my zones in the Zone Selection Bar (as shown below) where I want to assign my takeoff to Level 1 and designate it as a renovation.
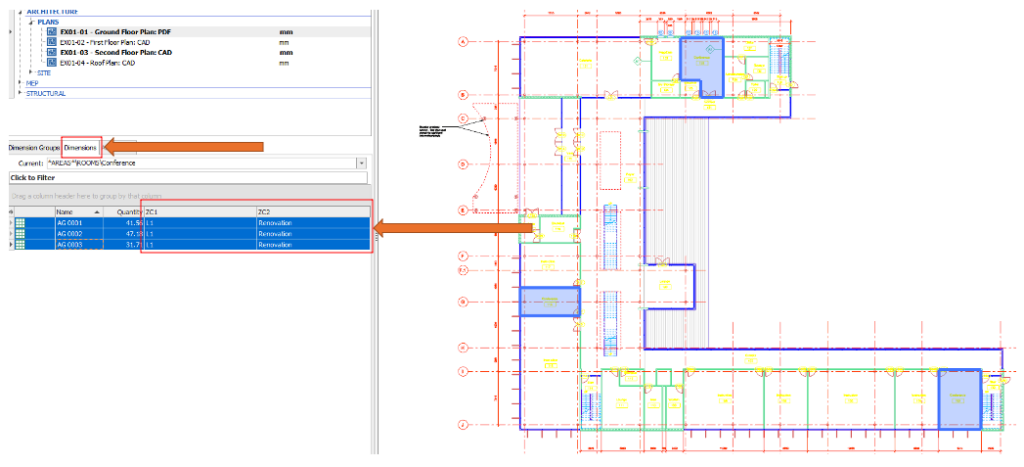
I proceed with my takeoff and then checking the Dimensions tab, we can see that the dimensions are correctly zoned.
If you need to make changes to applied zoning, there are a few ways to do this.
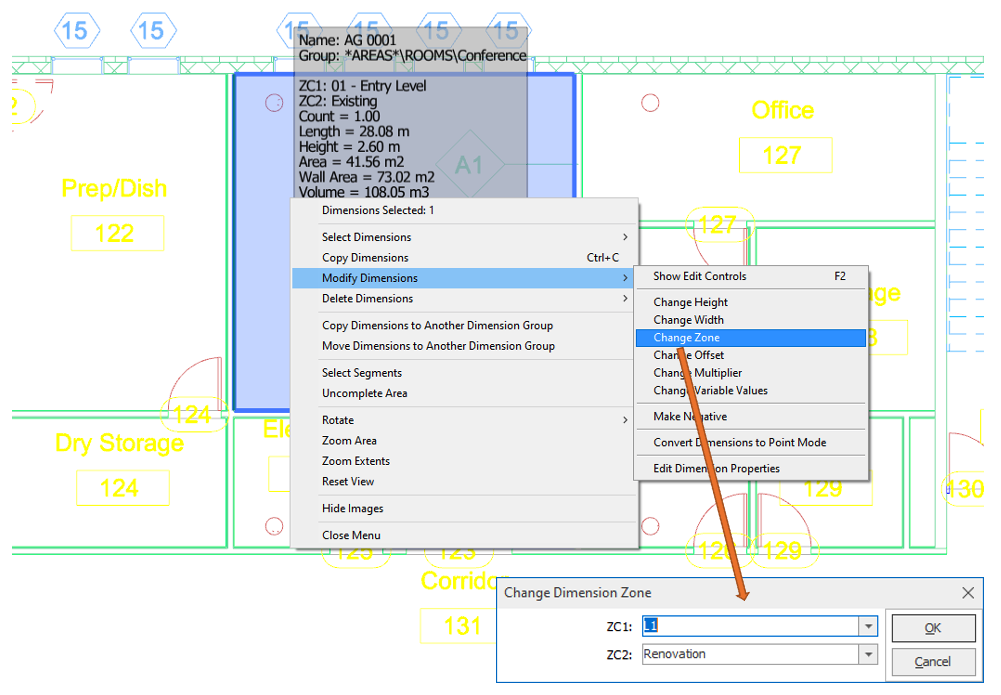
One way is to hover over the item that you want to change, right click on it, select Modify Dimensions, and then select Change Zone in the menu that appears. You will be presented with a Change Dimension Zone window where you can amend the item’s zoning accordingly.
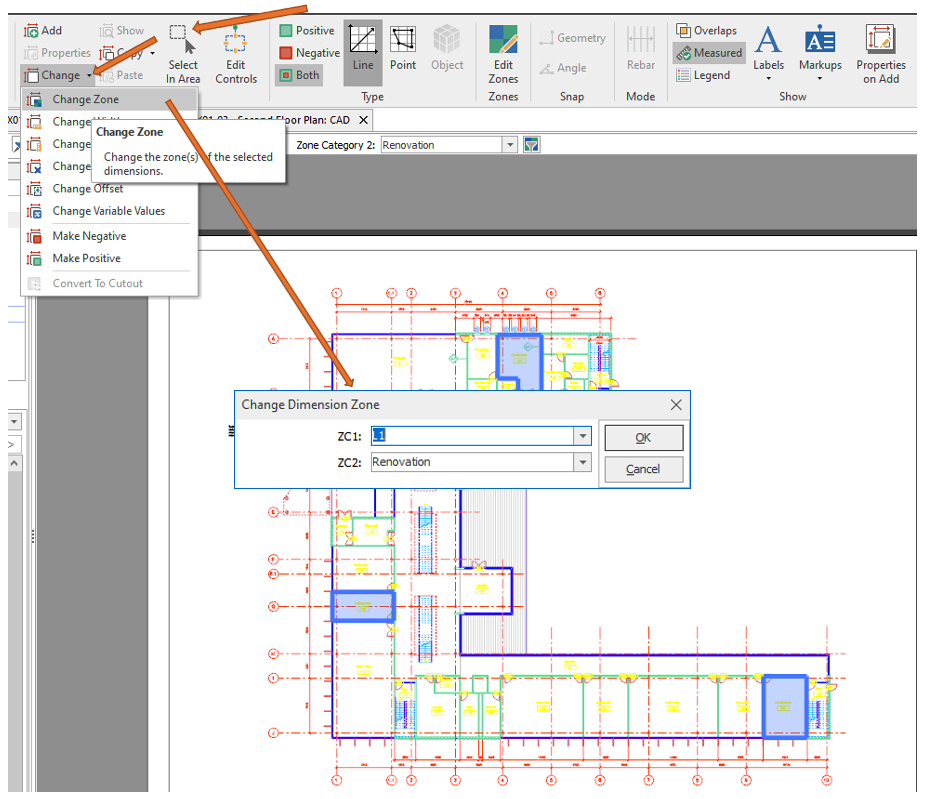
Another way is to select the items that you want to change by using the Select In Area button in the Dimensions Ribbon and select your takeoff. Then find the Change button and select the Change Zone in the menu that appears. Proceed to amend your zones accordingly. If you want to select only particular items, you can hover over them and click on them while holding down the CTRL button to add them to your selection and then perform the steps above.
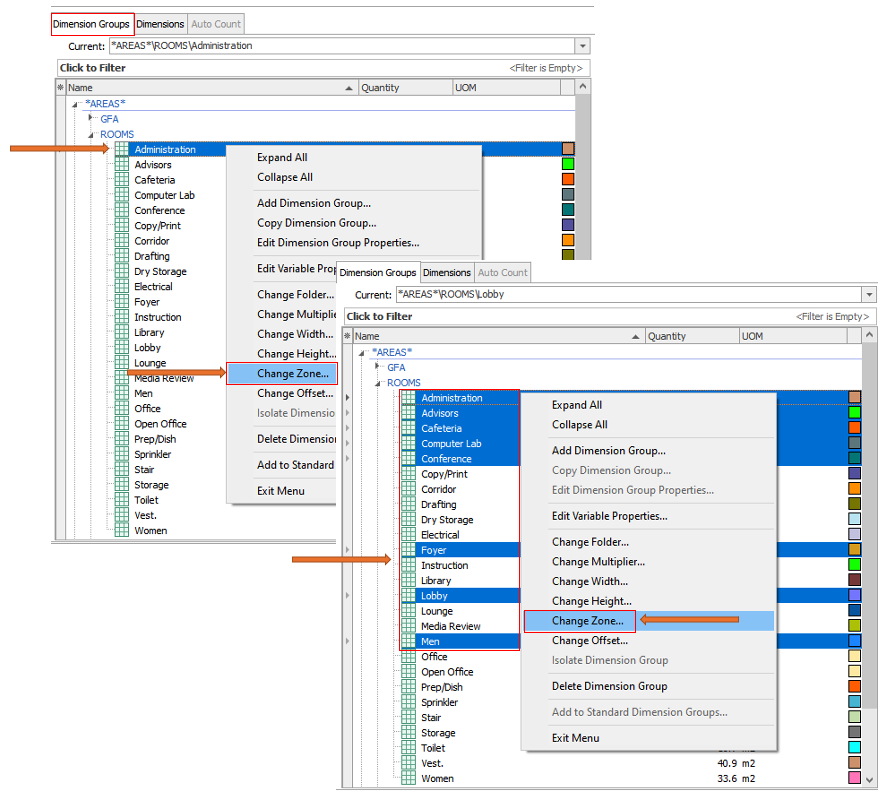
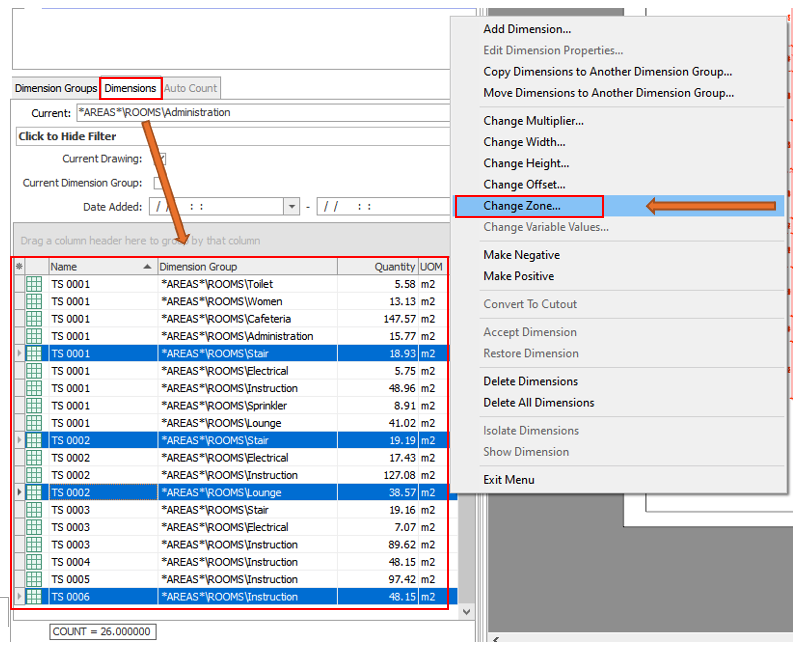
One more way to change zoning is to select specific Dimension Groups or Dimensions, right click on them, then select Change Zone from the menu. Multiple items can be selected as well if you need to change zoning to a particular selection of Dimension Groups or Dimensions.
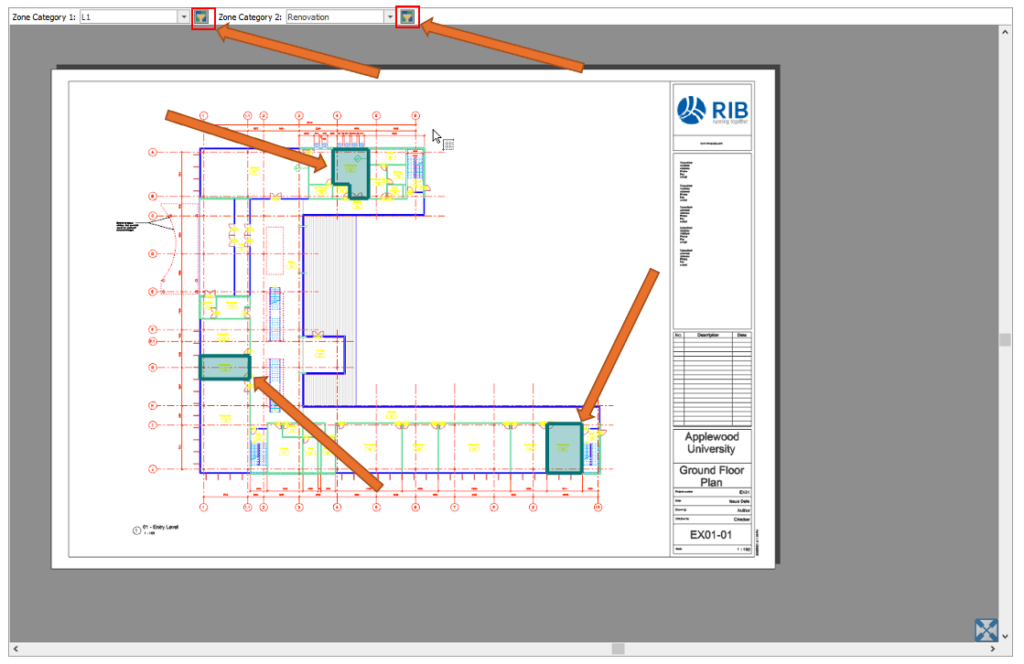
To visually check that our zoning has indeed worked we can utilize the zone filtering functionality in the Zone Selection Bar. In my example below I have completed the functional takeoff for the entire floor and want to make sure that all spaces have been allocated to a zone.
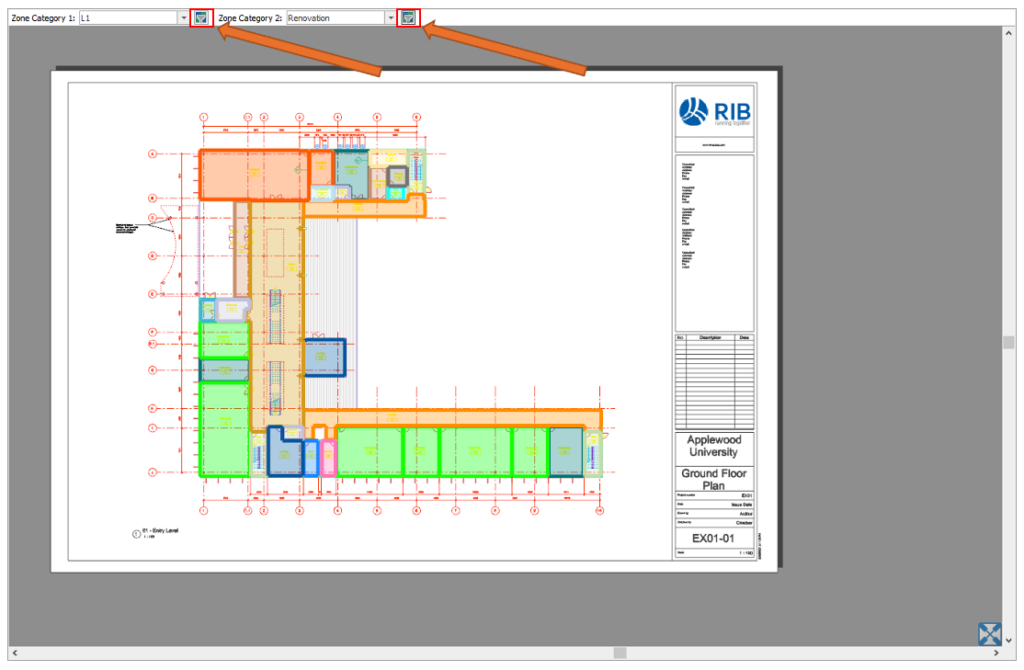
Click on the zone filter buttons and notice that they change from a gray to an orange color, indicating that they are enabled. I can now see that only my Conference areas have been properly zoned and that I need to allocate zoning to the remaining functional spaces.
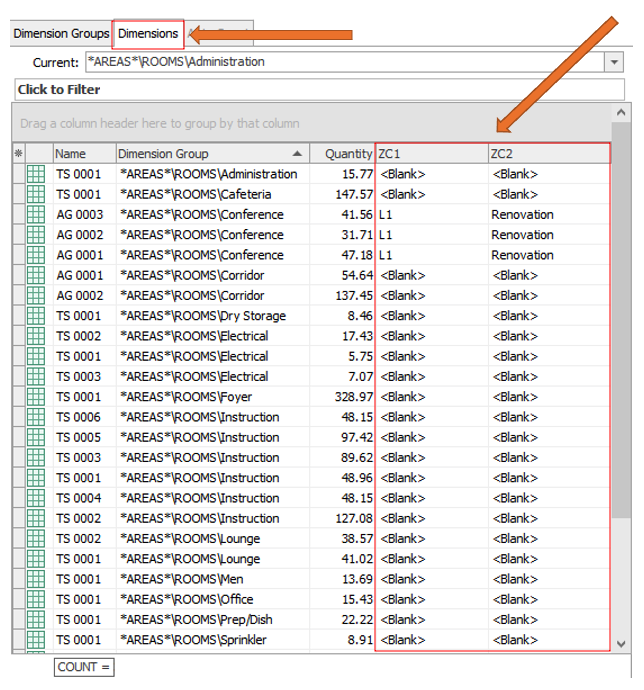
Another way to check zone allocation of selected Dimension Groups is to go into the Dimensions tab once you’ve selected your Dimension Group(s) and check the Zone Category header columns there. You can see that I’ve only assigned zoning to the Conference dimension group.
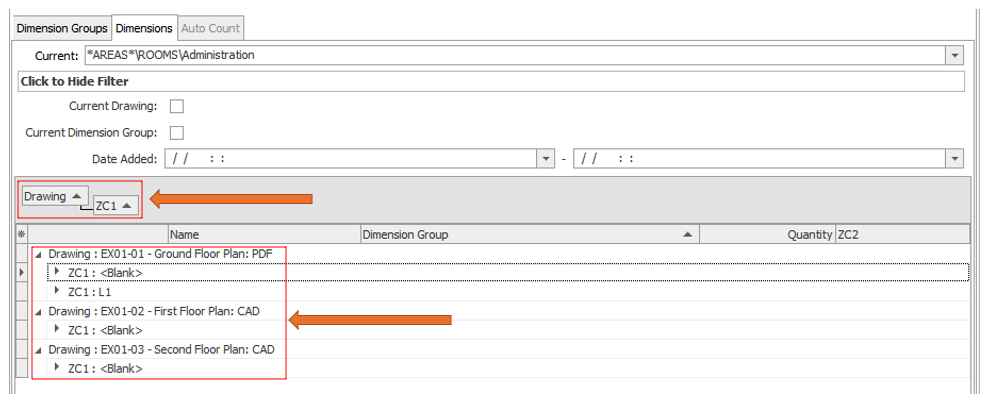
If you wish to further sort and filter the dimensions you may use the grouping functionality and drag and drop selected column headers to display the dimensions as you wish. Shown below for instance, I’ve grouped my dimension by drawing and ZC1. This shows me that I’ve partially allocated my selected dimensions on the Ground Floor and not at all on the First and Second Floor for ZC1.
In RIB CostX 7.0 the Dimension Groups tab in the Workbooks drag and drop window now provides the ability to filter dimension groups by zones.
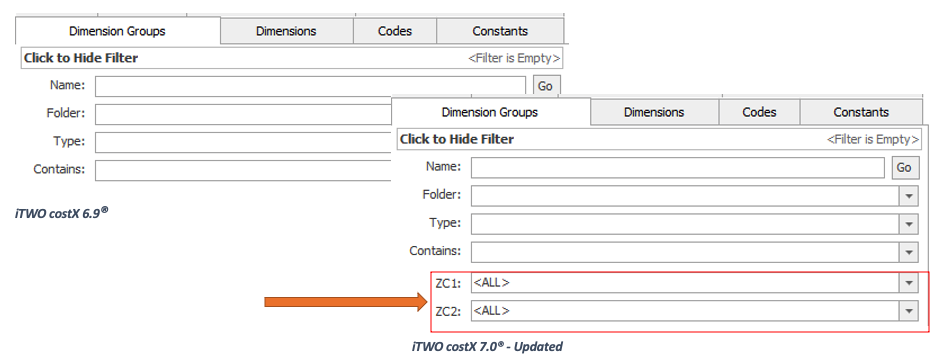
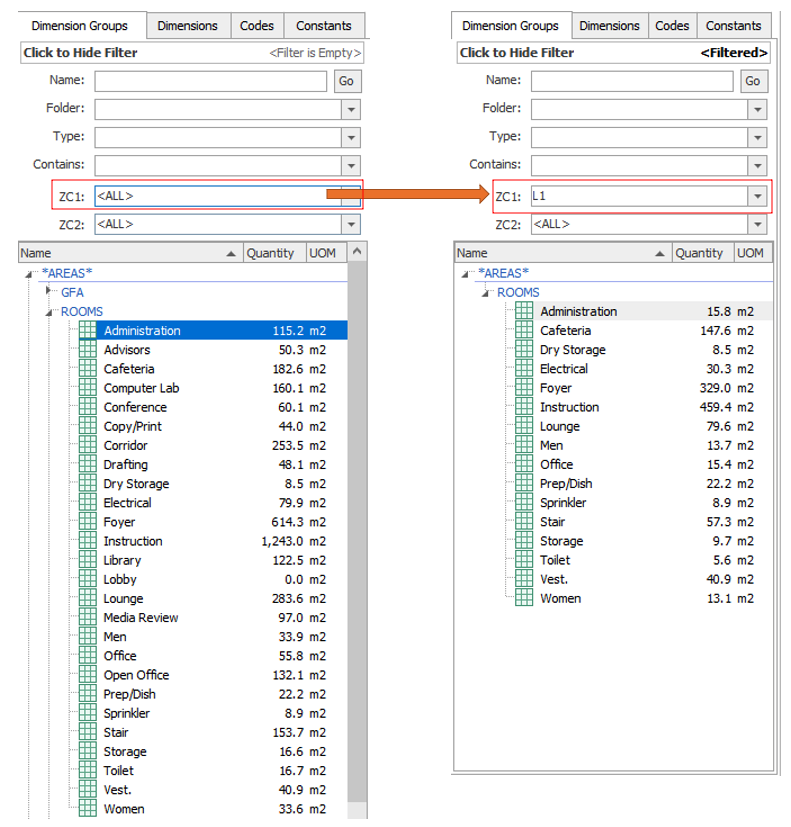
For example, note my functional area takeoff below on the left with zoning set to <ALL>. Selecting L1, for instance, now filters the Dimension Groups and shows only those assigned to that zoning. In my example, I’ve only applied zoning to my functional spaces so far and thus only those items are shown in the results. If I had zoned other Dimension Groups to L1, they would appear here as well.
The above functionality optimizes workflow in Workbooks by excluding items in the zoned selection that have zero quantities. In version 6.9, for example, when pulling in Dimension Groups into the workbook in bulk and zoning them, the output would appear as shown on the left i.e., all Dimension Groups including those with zero quantities. In 7.0, Dimension Groups are filtered first (as demonstrated in the functionality above), and thus no longer pull in any item that has a zero quantity when dropped into the workbook, as shown on the right.

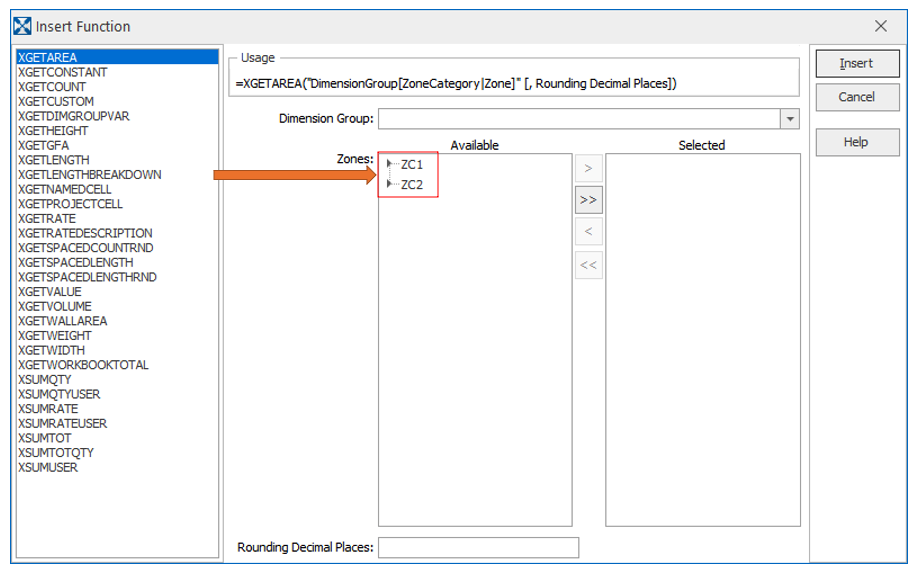
When creating functions in a workbook, zoning can be applied to the selected function and thus display only the desired values.
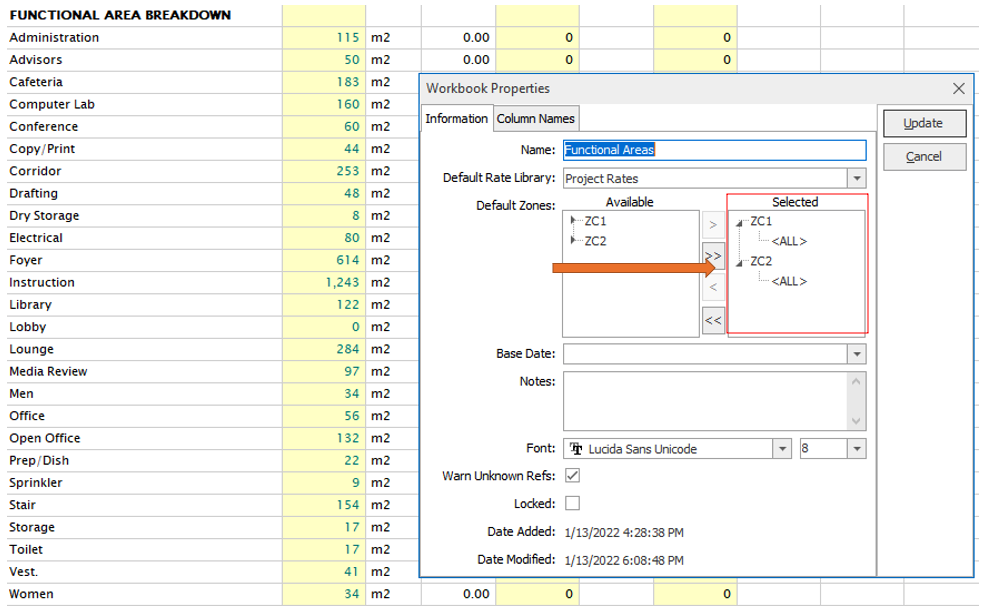
*NOTE* Zones specified on an individual function or Dimension Group take precedence over the default zones set in the Workbook Properties. In other words, if you set the zones for an individual function, changing the default zones in a workbook will not alter the result of the function
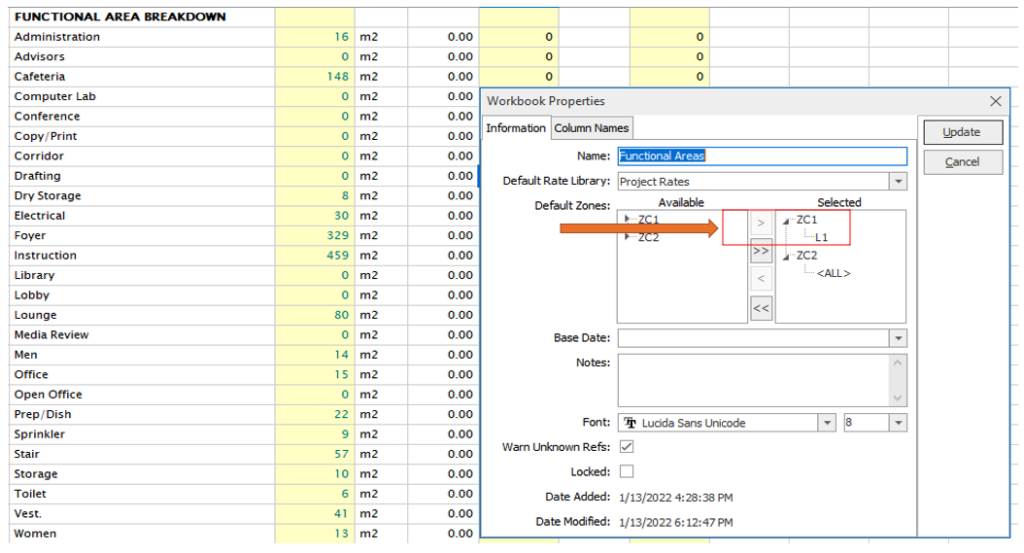
Zoning the entire workbook is possible using the Workbook Properties window. In my example below, if I pull in all my functional areas and then change the zoning from (first image) to on entire workbook, the output would be shown as below (second image). This is particularly useful after building up a complete estimate but then filtering out the budget by a particular zoning like floor, phase, or building component for example.
This concludes our overview of new zoning functionality in RIB CostX 7.0, as well as a review of using zones generally. Please reference the help file in your copy of RIB CostX to further clarify any of the material covered above. Should you have any questions, please feel free to contact your local RIB team today!

E-BOOK