
April 17, 2024
14 mins read
14 mins read


After the success of our last Product Specialist series, we are running another one: this time on Top Tips for CostX® Users. Our first Product Specialist to share their thoughts is our Principal Product Specialist Tony Shaw.
As Exactal Product Specialists, my colleagues and I spend a good proportion of our time travelling out to visit clients to conduct meetings, demonstrations and training sessions. As we do so, it’s great to see some of the amazing projects that CostX® is being used for and some of the astounding applications of the software. Clearly there are some great minds taking maximum advantage of the technologies inherent in the product and the flexibility that it offers.
That being said, I am also frequently surprised that users aren’t always abundantly aware of some of the available functions and features that others take for granted and, as such, they are not in common use. In a very small number of extreme cases this has led to users going to great lengths to work around a problem which doesn’t really exist- if only they knew!
Therefore, in this series of blog posts our Product Specialists will share some of their Top Tips for CostX® Users, to bring to light some of the lesser known features of the software that may help make your day-to-day working life a little easier.
I’m going to kick things off with something small and simple that the majority of you may well already be aware of, but for those that aren’t it’s proven in the past to be highly effective.
That function is the Dimension Overlay.
If I had a dollar for every time that I have seen users wrestle with measuring a new dimension adjacent to an existing one, then I may not be able to retire just yet, but I’d at least have a fair few extra dollars. As intended, when the mouse moves close enough to an existing dimension, the sticky-cursor will attach to that dimension allowing the user to perform any of the available editing functions: move, copy, change zone, change height, etc. If, however, you don’t want to edit the existing dimension but instead want to measure a new one next to it, then you need to detach the sticky-cursor. The usual means by which I see many users do this is to zoom in so far that the mouse becomes sufficiently distant to the existing dimension that it detaches. However, this isn’t necessary as our developers had thought about this scenario and provided a more straightforward means: simply press down the ‘O’ key on your keyboard.
For example, when measuring interior walls in point mode, say, I can click from one end of the wall to the other in the usual way.
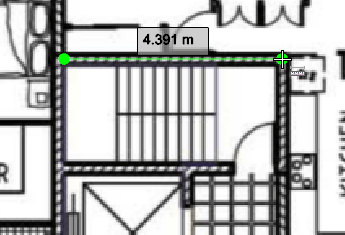
As soon as I release the second mouse click, the cursor attaches to the end-point and changes to the move dimension symbol ( ), meaning that if I click the mouse again it will pick up the end-point and drag it wherever the cursor goes. If my intention is, however, to measure the next length of wall running down the drawing, then this is not what I want.
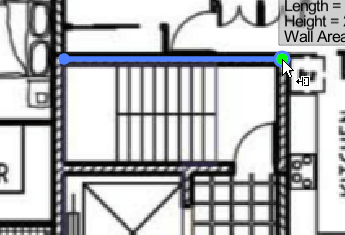
What I need to do is instead keep the mouse exactly where it is and press and hold down the ‘O’ (overlay) key. The cursor changes back to the cross-hair symbol and I can click to begin a new dimension precisely where I had left off from the first, without zooming, starting from the other end, or any form of swearing required at all.
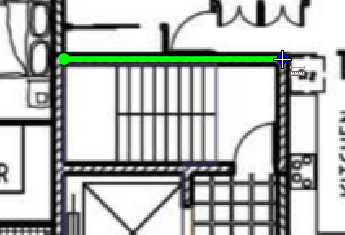
As soon as the first click for the new dimension has registered then I can then release the ‘O’ key and move the mouse to measure the next length of wall.
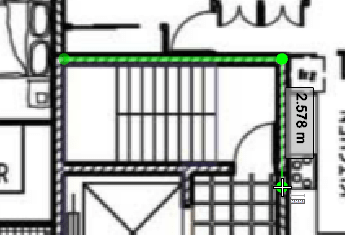
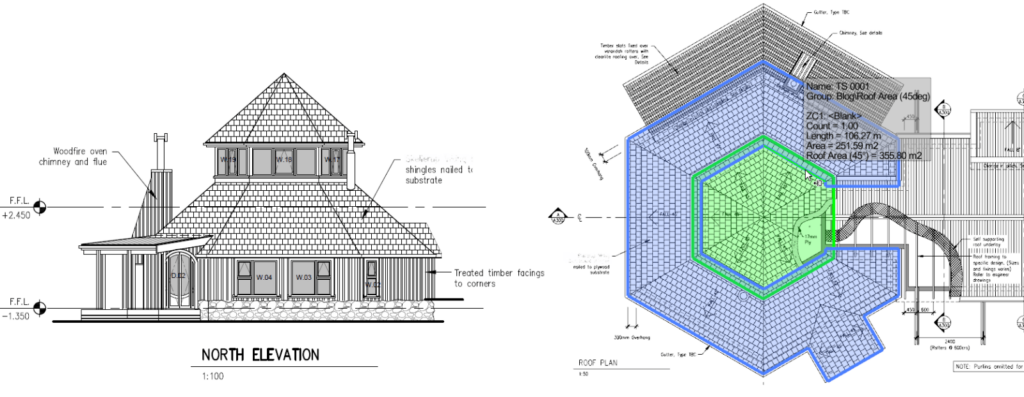
This function works equally well for both Point and Line type measurement, and even allows for dimensions to be measured that overlap other dimensions in the same (or other selected) dimension groups in whole or in part. For example, in a building such as the one shown below, the high and low level roofs overlap one another when viewed in plan. Using the ‘O’ for overlay function, it’s possible to measure both into one dimension group as shown by the green high-level and blue (selected) low-level shaded areas.
As with all of the best things, this function is simple but effective (like me!) so I hope that if you weren’t aware of it previously, armed with this new information it will make life easier and you will continue to enjoy using CostX®.
If you have any Top Tips for CostX® users of your own then please feel free to forward them to [email protected] and we will be sure to share them in future!

E-BOOK